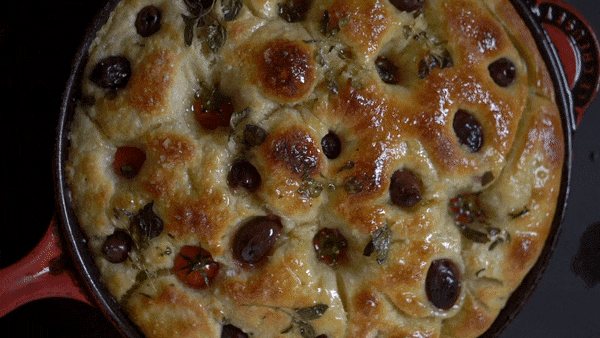
Effectively a high hydration and slightly over-proofed sourdough, all you really need for a successful focaccia is a strong starter and a dash of patience (for little technical skill is required to bake this most satisfying of breads).
If this newsletter has somehow found its way into your hands (and you’re not yet subscribed), allow me to help you out:
What some of you are saying: Paola I want to get started baking sourdough but I’m a little scared I’ll fail…
What I’m saying: over the past couple weeks, as the temperatures in my area peaked at 100°F/38°C, I f-ed up more loafs than I can count (like I really did stop counting).
Why?
Because I don’t have air conditioning at home (I know!) and as I quickly learned, sourdough cultures behave slightly erratic when overheated:
I managed to unalive* both my starters, with Montana succumbing to a fungus in just 24 hours and Yosemite simply stopped rising (this one was a bit of a shocker, as this is an incredibly strong little colony said to be a few hundred years old). I quickly gathered that I simply wasn’t feeding them enough, so they’re now on a twice daily schedule. (*I keep clones in the fridge for this very reason)(and I’ve a dehydrated version too lol)
still, while they gathered strength I may’ve gotten an answer many of you have asked– why some of your breads aren’t rising at all during the second cold proof in the fridge: your starters simply aren’t strong enough besties.
You see, I attempted a focaccia last week with Yosemite once she’d doubled a couple times and I thought she was strong enough… nope! The dough didn’t look terrible at room temperature, but it didn’t get any rise at all in the fridge (it did bake ok-ish, but it lacked a lot of oomph and the texture was quite mid).
So how to fix it? My guess is that if you’re keeping your starter in the fridge and just feeding it a couple times a week when you want to bake bread (my Yosemite clone had been hanging out for a couple weeks unfed)… you might need to keep it at room temp for at least a week every once in a while with daily feedings (or twice daily as we learned from my case)(you’ll know you need to increase feedings if your starters are overly flat and acetic after 24 hours and taking more than 3 hours to double once fed again).
but the misadventures did not end with my prodigious starters: as it turns out too fast proofing due to overly warm temperatures, paired with the contrasting temperature of a cold proof, leads to some funky crumbs (with gaping holes throughout)(I’ll show you next week once we talk about… beetroot bread 👀)
Still. I also learned that all can be overcome once you learn to guide your sourdough cultures through your present conditions.
So my point?
That I wouldn’t have learned all that if I hadn’t f-ed up (as I certainly lacked the know how to read the situation). But now I can add to my baking curriculum the ability to bake sourdough in sizzling temperatures.
i.e. sourdough is a dance, whereby you’re simply aiming to provide the best thriving conditions for your cultures to perform their millennia old process… and just like with everything else worthwhile in life, you’re going to learn by failing upwards.
Still, still. No one likes to f-up a couple days work, particularly when the result can be some very real hanger… so allow me to introduce you to focaccia: the Italian flat bread par excellence (and a handy one to know how to make in case you royally overproof your dough).
Why? Because that’s effectively what focaccia is: a high hydration sourdough (80-100%) that’s been proofed to the point where it bakes fairly flat, resulting in a supremely crunchy crust with a fluffy interior.
So if you ever find that you’re struggling to shape your sourdough after the first rise (you’ll know right away as the gluten bonds will have broken down to the point that it doesn’t want to hold a shape), drizzling it in a generous amount of olive oil and placing it in a baking tray or cast iron skillet (my personal favorite for ultra crispness), and just let it hang there until it doubles in size during its second rise.
The bottom line? I think you’ll find that the only times your sourdough will come out inedible are, more often than not, related to not proofing it long enough– as the crumb will come out dense and dry, while the crust will be sharp enough to razor through your gums 🪚
OK, but (non accidental) focaccia! 🕵️♀️
i.e. the easiest and most satisfying sourdough bread to bake imho, because dimpling in the evoo might just be equivalent to having Miss Hoopje purring on my neck [insert cozy activity of choice]
The recipe is simple: 90% hydration, 20% active starter, 2% salt (plus extra virgin olive oil aplenty to handle)
Because as we learned during our purple sweet potato bake, sourdough bread recipes are, more often than not, given in percentages (as this allows bakers to scale with ease)(and it comes particularly handy with focaccia as it needs to be scaled up or down depending on your chosen baking dish). Say, for my 9 inch cast iron I use the same amounts as I would with a regular loaf (which should also tell you just how over-proofed the dough is as it bakes flat)
starting flour amount: 500g unbleached bread flour = 100%
hydration: 450g spring water = 90% hydration (= 450g/500g x 100% = 90%)
active starter: 100g (= 100g/500g x 100% = 20%)
salt: 10g = 2% (= 10g/500g x 100% = 2%)
Now. You can either bake it just with some olive oil and a herb (rosemary is the classic, but fresh oregano is a personal favorite)… or you can be extra by adding anything from olives, roasted garlic (don’t add raw cloves– they won’t caramelize), sun dried tomatoes and (my other personal favorite) cherry tomatoes*. And yes, you can also go sweet/savory and pair fresh berries such as strawberries or blackberries with goat cheese (basil, oregano or thyme would all work great here)(generous balsamic drizzle non negotiable)(and some smokey sea salt as the figurative cherry on top).
endless permutations await besties, each one just as scrumptious as the next 🤤
*side note: adding cherry tomatoes does come with a warning, as you really do need to procure actually flavorful ones for the stunt to be a success. As the juice will burst through the focaccia while baking, leaving pockets of pure tomato goodness throughout (say comparable to the flavor of the Spanish tapa “pan con tomate”)(but the result isn’t actually good unless your tomatoes are packed with flavor)(and yes, you will have to increase your baking time significantly to allow for the juices to bake off).
Also, these are my first homegrown tomatoes… ever– I harvested a whole 10 of them lol. And other than being exceedingly proud of myself for their beauty and taste (I was truly fearful of this one), I also learned the magic that is “fresh off the vine” tomatoes. So I highly suggest that if you find yourself with the same luxury, to ensure to cut them with (!!) the vine as it’ll help to boost the tomato flavor a bunch in your cooking– you see, they’re often used as a seasoning similarly to bay leaves, which aren’t edible either (as yes, they do contain some toxins… but you’d have to consume a few plants worth for the effects to kick in).
(ask a question, post a thought 🤌🏼)
xo! Paola
p.s. I personally adore focaccia as I find it to be one of the easiest breads to digest given how well proofed it is (so alot of the sugars and gluten bonds have broken down, resulting in a highly prebiotic resistant starch mix with more available nutrients).
p.p.s. it also makes for the perfect “appetizer bread” for grilling season (and I’m even beginning to dabble on baking it in my new outdoor pizza oven)(but clearly I haven’t dialed in the temperatures quite yet lol… something new to f-up and fail upwards to ;)
p.p.p.s. adding a cheese like feta to the mix is also a terrific idea, just be mindful that if you aren’t finishing your focaccia in one go you don’t want to bake any dairy in it (as you always want to store your sourdoughs at room temp)(i.e. just sprinkle it before serving or before reheating)
and last p.s. I can’t seem to upload the longer video tutorial to youtube (I somehow know I oopesied the conversion to a smaller file)(yes, I’ve a few start-to-finish videos for you this week!). But perhaps some good came from this failure too, as I created some little gifs for you of a couple steps– I’m thinking this might be a good way for those of you who are new to this to visualize all the steps as you work through the recipe, lmk!
(90% hydration) sourdough focaccia
Expect an ultra crisp exterior with a soft fluffy crumb 🤌🏼
To scale to desired size (or for one 9-inch skillet in grams)
ingredients
90% (450g) spring water
20% (100g) active sourdough starter
100% (500g) unbleached bread flour*
2% (10g) fine sea salt
extra virgin olive oil, a 1/4 cup give or take
ideas to garnish
cherry tomatoes
olives or roasted garlic
rosemary is “the classic”, but I personally adore fresh oregano
feed your starter
Add roughly 70-100g of flour to feed your starter (you want 100g of active starter for the recipe, so it depends on how big you keep your starter (say you may want to feed it for a couple days without discarding if you keep a small one going)(or if you’re taking yours out of the fridge you’ll def need to do one feeding before it’s strong enough to bake with).
Add enough spring water (you don’t want filtered, you really do want the added minerals) until the dough resembles a thick pancake batter. Generally 70g of water/100 g of flour (i.e. a 70% hydration) is enough to get the consistency right. But if you’re using heritage grains or most gluten free flours you’ll need to add a little more.
Allow to rest for 3-6 hours in a warm(ish) place: until it doubles in size. You can test for prime activity fairly well either using the float test (as it sounds: check if your starter floats in a little water) or the burn test (tap your starter on the counter to “break the surface”, light a match and if it blows out it means your starter is using up all the oxygen in the surrounding area i.e. it’s sourdough time).
3-6 hours later: make your dough
Add the water (preferably at room temp) and active starter to a large bowl. Using your hands (though some peeps favor a danish hook) mix the starter with the water until dissolved (don’t overthink it if a few lumps remain).
Add in the flour and salt and mix with your hands until just combined and the dough is all shaggy (and yes, super sticky).
Cover with a kitchen towel and let it rest for 30 minutes.
30 minutes later: bulk rise (plus stretch ‘n fold)
Thirty minutes in you’ll want to do a single set (yup, just one is needed!) of “stretch ‘n folds”: grab a hold of the dough, stretch it upwards and fold it down towards the center of the bowl. Rotate and repeat four times like this:
Drizzle olive oil onto a medium sized bowl and transfer the dough gently (as its easier to gauge the rise if you can actually mark it with a sharpie) and cover with a kitchen towel.
Allow to rest for 4-10 hours, or until *just* doubled in size (remember that time here is directly influenced by temperature so it’ll vary greatly). And unlike regular sourdough, I actually don’t let my dough triple at room temperature here as I prefer to now pop it in the fridge so I can bake it *exactly* when I want.
You’re dough will be all jiggly and bubbly like this:
optional: cold proof
Cold proofing here helps to develop flavor further, but you can also skip it.
Transfer the dough to the fridge once it has doubled in size. It can stay there for up to 48 hours… but I generally just do 12-24 (just make sure that it doesn’t triple in size!).
vip note; I know some folk like to transfer it to the fridge already in its baking dish (effectively doing the second rise as a cold proof as we do with regular sourdough loafs), but imo doing the second proof at room temp works best when it comes to sourdough focaccia given that we’re throwing olive oil in the mix (fats really do make the culture work so much harder, which is why so many sourdough recipes out there for focaccia also add a tablespoon of active yeast).
2-4 hours before baking: “shape”
Lucky for us focaccia doesn’t require actual shaping, but I do like to give it a couple folds with olive oil when transferring it onto your baking dish of choice from the fridge (think of it as a gentler alternative to punching the dough, while beginning to incorporate layers of flavor)
Drizzle enough olive oil to generously coat your baking dish and transfer in your focaccia dough like this:
Allow to proof at room temperature for about 2 -4 more hours, or until super bubbly and doubled in size .
another vip note: your focaccia may stick somewhat to pretty much any baking dish you use. Some folk like to grease them with butter (I don’t as it does change the taste profile) and others line the dish with parchment paper (I don’t either as the crust ends up significantly less crisp)– just expect your focaccia to stick slightly in certain parts, but as long as it’s oiled well enough it’ll still come out with a nudge (or five).
garnish ‘n bake away!
Preheat oven to 425°F/220°C.
Drizzle more evoo on top and, using your hands, dimple it in while giving it a little wiggle to break up the biggest bubbles. Nestle in your herbs and toppings.
Bake for approximately 30 minutes if you’re only using herbs, to 35-40 minutes if your toppings aren’t overly juicy… to up to an hour if you’re adding something like cherry tomatoes. I like to place a dome of aluminum on it once I see it beginning to overly brown (just be sure to place it strategically to allow the steam to escape)(and also feel free to drizzle in a touch more evoo during baking if you see the top is looking a little dry)
Hold your horses for 15-20 minutes before serving (it’ll still be warm, worry not!) and enjoy.
Store at room temp in an airtight container for a few days.
*King Arthur is likely the easiest, yet still pretty great, bread flour to “learn” sourdough with (but we’ll begin to dive unto my experiments with heritage flours next week).
A quick side note about cherry tomatoes. If you roast them with a toss of olive oil salt and pepper in the over on very high heat until they are slightly charred they turn into tomato candy. It’s like creamy gooey tomato bites! So Yumm!
Hi Paola! I want to do this! Question. My starter is active and i have 100 g. Do i still need to add 100 g of flour and 70 g of water for the first part of the recipe? Thank you